BIOENGR 167L - Bioengineering Laboratory
BE 167L - Bioengineering Laboratory
Lab 1: Solutions, Measurements, and Microscopy
Solutions, Pipetting, and Scales
In the laboratory, you will need to interact with both liquid and solid reagents. As an introduction, this lab will introduce you to the equipment used to handle and measure these reagents respectively. Handling small volumes while pipetting is a crucial skill you must master in a wet lab environment. In this part of the lab, you will learn to operate multiple pieces of equipment in order to create a buffered solution and record the pH of your solutions.
Prelab Preparation
Pipettes and Pipet-Aids cost several hundred dollars EACH. You must have an understanding of how they work in order to prevent possible damage. Read the Good Laboratory Pipetting Guide from Thermo Fisher. Watch the lab primer video.
Review the following instructions PRIOR to your lab where your TA will demonstrate.
Liquid Loading
- Slowly press the pipette plunger down to the first stop (most of the way), you will feel the resistance.
- Insert tip about 1 cm into the liquid and SLOWLY let the plunger slide back into the rest position. Note: Don’t let liquids bounce up into the pipette shaft. This can damage your pipette and contaminate the rest of your samples.
- Repeat this 1-2 times to condition the pipette tip. Then collect the water.
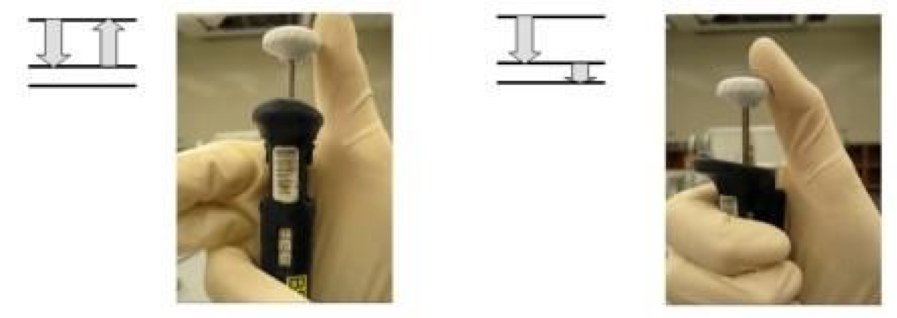
Liquid Dispensing
- Transfer the pipette to the new container.
- Slowly press the plunger down to the first stop, then slightly harder until it reaches the second stop to unload.
- Slowly release the plunger to the rest position to avoid back splash of liquid onto pipette shaft.
Preparation
Reagents
- DI Water (12 mL)
- MEM powder (120 mg)
- Sodium Bicarbonate NaHCO3 (25 mg)
- Hydrochloric Acid HCl (0.5 M)
- Sodium Hydroxide NaOH (0.5 M)
Supplies
- 15 mL conical tube
- Pipette tips
- Sharpie marker
- Serological Pipettes
Equipment
- Pipettes
- Pipet-Aid
- Scale or balance
- Tube rack
- pH meter
Procedure
- Weigh out 120 mg of the MEM powder supplied by the TA.
- Dissolve your MEM powder in 12 mL of DI water into a 15 mL conical tube and label this tube as buffer.
- Take out 2.5 mL of your solution and place it into a new 15 mL conical tube, do this again so that you have a total of 3 conical tubes.
- Label one tube acid+, and the other base+.
- To your buffer solution add 25 mg of NaHCO3 then repeat steps 3 and 4, except label these tubes buffer acid+, and buffer base+.
- To your tubes labelled acid+ add 100 µL of the HCl solution provided by your TA, and to your tubes labelled base+ add 100 µL of the NaOH solution provided by your TA. Record any observations at this time.
- Measure the pH of each solution using the pH meter and record measured values in your lab notebook. Consult your TA for further guidance if necessary.
Plate Reader and Serial Dilutions
In addition to creating solutions, you will often find that you need to dilute them prior to use. In this section of the lab, you will practice generating serial dilutions of your previously made buffer. In addition, you will take absorbance readings of your serial dilutions to verify your technique as well as generate data to perform statistical analysis on.
Preparation
Reagents
- DI Water
- Buffer from Part 1
Supplies
- 96 well plate (shared with another group)
- P200 pipette
Equipment
- Plate reader
Procedure
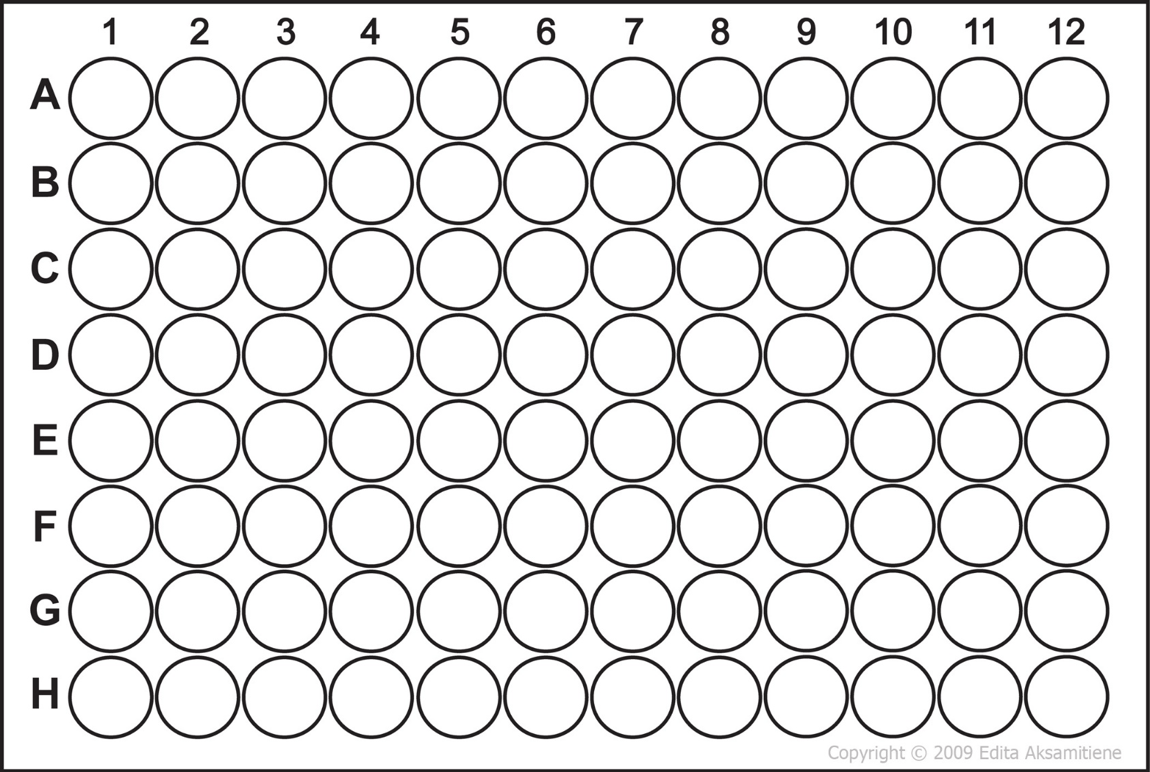
- You and your partner will share a 96 well plate with another group be sure to properly record which wells belong to your group.
- You and your partner will generate 4 serial dilutions using your buffered solution. Each step of your dilution should cut your concentration in half (a 2x dilution), and the final volume in each well should be 100 µL. You will perform 4 steps for each dilution which should result in 4 wells with the following concentrations (1x, .5x, .25x, .125x). Also add 100 µL of water to 4 wells to represent a concentration of zero. For further clarification consult the posted video then fill in the attached template with your dilution scheme.
- In addition pipette 100 µL of your acid+ and basic+ into four additional wells respectively.
- After you have finished pipetting take your plate to the TA to have it run on the plate reader, and record the absorbance values in your lab notebook.
Light Microscopy
Particle and cell density can be measured using a hemocytometer and inverted microscope. Each student should count the beads, calculate the bead concentration and compare their results with their partner. Beads will look uniform and round. You may see particles which are not round, much smaller, or much larger than the beads. Do not count this debris.
Preparation
Reagents
- Water
- Solution of 10 µm beads
Supplies
- 1.5 mL – 2 mL microcentrifuge tube
- P1000 pipette
- P200 pipette
Equipment
- Inverted microscope
- Hemocytometer with glass coverslip
Procedure
- Dispense 500 µL of water into microcentrifuge tube.
- Add 100 µL bead solution from your TA to the water. Keep track of this tube of microspheres for future labs. Store in your drawer with your initials on it.
- Uniformly distribute the particles by pipetting the liquid up and down. Do this just prior to collecting the liquid to place on the hemocytometer. Beads and cells settle quickly.
- Make sure your hemocytometer is clean. If needed, wipe gently with 70% alcohol and a Kimwipe.

- Place your coverslip on top of the mounting supports.
- Load the sample of the bead suspension into one side of the cover-slipped hemocytometer at the sample induction point (see below). Use a P200 or P20 pipette and draw up 10 µL of bead suspension (make sure it is well mixed before drawing up your sample). Place the end of the pipette tip against the sample introduction point (the depressed triangle at the edge). Slowly eject some of your suspension and allow capillary action to draw the liquid underneath the coverslip.
- Place the hemocytometer on a microscope stage and check that the magnification is 100x (10x objective x 10x eyepiece = 100x magnification). Find the grid pattern on your hemocytometer. There should be small beads scattered around the grid (see below). Distinguish between beads and dust or debris - beads will be spherical and uniform.
- Check the side of the objective you are using to determine the working distance and the numerical aperture. Determine if the working distance is appropriate for looking through the distance of the hemocytometer.
- On the side that you loaded you will count all of the beads in the squares that comprise the 4 corners of the grid (1, 3, 7, and 9, or 10, 12, 16, and 18) as labeled in the diagram below. Each corner covers an area 1 mm by 1 mm. Beads overlapping the top and left hand sides of the square should be omitted from the count. Counting all overlapping beads would produce an artificially high bead number by increasing the actual volume of bead suspension in the counting area. (Refer to the posted video for further instructions.)
- Calculate the average number of beads per counting square. Each square is 1 mm long and 1 mm wide. The chamber itself is 0.1 mm deep. The volume of the liquid above one square is therefore 0.1 mm3. Since 1 mm3 = 10–4 cm3 the volume of the liquid counted is 10-4 mL. Your bead concentration beads/mL is the number you counted multiplied by 104. Do your own dimensional analysis to confirm this.
- Have your partner load another sample and count the number of beads. If the counts agree, you’re both in good shape. If not, one of you had a problem either loading or counting. Ask the instructor for help if you’re not sure.
- Immediately after use, clean the hemocytometer and coverslip with 70% alcohol and dry with a Kimwipe. Store in plastic case and return it to your TA.
- Clean up all materials and check with TA before leaving.

Common sources of hemocytometer count error: Variable sampling from the original bead suspension. The original bead suspension must be thoroughly mixed just prior to sampling or beads will settle to the bottom quickly. Inadequate or excessive filling of the hemocytometer chamber.